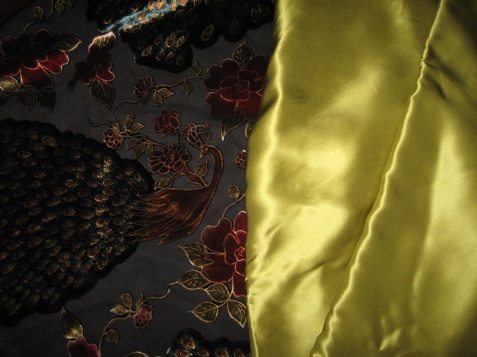
Yes, peacocks! When I first described this fabric to friends – apparently they were picture peacock-colored fabric. So needless to say they were surprised to find actual peacocks all over me!
 Anyway, this dress was a labor of love – following both couture techniques included in the pattern, as well as others I have picked up along the way on other classes and looking at historical garments. Basically, during my August vacation, I visited the newly opened Silk Road Fabrics in Auburndale, MA… and was simply blown away by this cut silk/rayon velvet patterned with roses, vines and yes, peacocks. The sheer black background was tried over a number of different colors of silk charmeuse… but ultimately this bright lime green won out. With the addition of some black silk organza for interlining, I was ready to get started… and this was the winning dress pattern:
Interestingly, this pattern is based on a vintage bias-cut dress from the 1930s – one of my favorite decades for fashion! All of the fitting is done through a pair of three darts: one diagonal front dart, one back vertical dart, and one horizontal dart. And of course, it says right on the pattern “no allowance made for above waist adjustment” (or something like that… you get the idea!) So basically no easy way to do a full bust adjustment (FBA.)
Would I let this deter me? Well – for a few days, yes. I made an initial muslin (with no adjustments) and tried on and debated for about a week about whether or not the bias cut would allow me to get away with skipping the FBA. Ultimately I decided it it was worth the extra effort (math, redrafting, additional muslins, etc) and invented my own bias-cut FBA. (I’m sure others have done this before but I couldn’t find any online tutorials – or suggestions in any of my dozen fitting books.)
 First of all – I should mention that this dress is a single pattern piece with a center back seam. However, other than the zipper place at the left side, the pattern is a mirror image at the center front. (i.e. it could be placed on a fold if it weren’t for the bias grainline)
So for my bias FBA – I only worked on redrafting the left side of the pattern. I split the pattern lengthwise from neck to hem, running through the bust apex marked on the pattern. I spread the pattern apart about 1.25.” Normally it would be between 1.5 and 2″ but I did want to allow for the extra ease provided by the bias grainline.
You can just see the extra space from widening the pattern at the center bottom of the photo. To get the shaping I needed for the FBA, you can see how much I widened the main front dart. It starts just below the bust apex and curves back, ending at the lower hip. This made for a VERY wide dart – but it worked perfectly during the subsequent muslin fittings. The dark lines on the right side of the image are the final darts – the paler lines and everything on the left side of the photo are the original markings.
I didn’t add any extra length to the pattern pieces – normally I would add 1/2″ to 1″ but again I figured the bias drape would weigh the dress down and stretch out the fabric. Fortunately I guessed right! It took three muslin fittings to perfect this – but hopefully you’ll agree it was worth it!
With the muslin perfected, it was time to transfer all the cutting lines and markings to silk charmeuse. I decided to baste the velvet and charmeuse layers together to work them as one so that meant basting all the darts, zipper markings, and matching dots & notches. As both fabrics were incredibly slippery, I used weights to keep everything in place and basted everything while it was flat on a table. Difficult to see – but most of the dart markings have been basted in the photo above. Around the cut edges I used pins since the sewing time was nearly constant – there wasn’t much worry about losing pins or layers separating.
 Following the traditional couture methods, all the darts were basted together by hand and then machine stitched. This was especially effective since I was working with velvet which has tendency to creep while sewing. (One of these days I’ll buy a walking foot!) From that point on I pretty much followed the instructions, working the two fabrics as one throughout the process. For the facings and zipper placket, I also used the two fabrics to keep the finishes consistent. The zipper placket, which is inserted into a cut slit at the left side, was a new technique for me but not too bad when following the pattern instructions. I did have to hand-sew the actual zipper in several times as the drape of the fabric kept fighting against it as soon as I tried on – but finally on the third attempt it was laying properly.
After not too much more time, the dress was finished except for hem and armhole trim. I lucked out on some great red beaded velvet trim which worked for the armholes. It was a bit wider than I hoped for, but the rich red color really helped the roses in the dress to pop. Lorrie at Unique Boutique Boston was kind enough to mark the hem for me (and be the first one to ‘wow’ at the gown which was very gratifying!!) and after a bit more hand-sewing… all was finally finished!
I don’t dress up very often… but as I was the guest of honor at the party I wore it to – I must say it felt fabulous to be wearing such a stunning dress!

