Yes, you read that right… Today’s post is one in a series (hopefully) of projects I’ve been sewing this summer but never quite got around to writing about. Apparently I need a little cheering up and so looking back at how many projects I’ve finished should help….
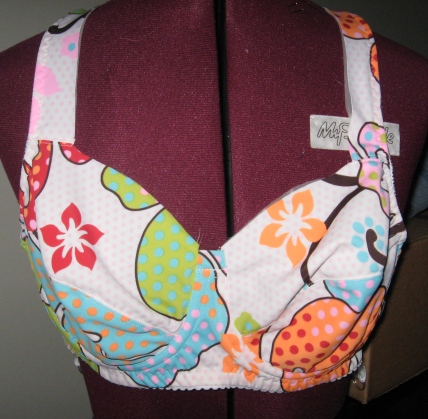
I’ve had the fabric and notions for a few bras since taking the fantastic bra-making course with Marijane Johnson back in June. However I don’t think it was until sometime in August that I actually got around to cutting one of them out! I will say I’ve been wearing the boring old flesh-toned bra I made in class for months… but it’s now much more fun to wear the white, green, red & orange mod print bra! With a little bow in front of course.
My class bra pattern was a Pin-up Girls Pattern, size 32E with lots of adjustments. I tweaked it further for the latest bra (and could probably still use a few more tiny tweaks – but the fit really is damn near perfect.) My latest version of the pattern has been transferred to swedish tracing paper so I’m not dealing with all the slashed, spread & taped pieces any longer!
Cutting out the pieces is pretty quick – and about the only thing I use my rotary cutter for. I’ve never liked using them… but they sure do make a difference with working with stretchy lycras! Unlike my class bras, this new one used two layers of fabric (I can’t remember what the underlayer is called) but the upper layer is basically swimsuit material. Very bright swimsuit material.
All of the construction technique were learned in the class although I did have to refer to my notes and the text we used, The Bra Maker’s Manual, fairly often since it had been two months since learning it all! I’m still pretty impressed that it’s possible to make these at home on a regular sewing machine – but a great deal of it is having all the right materials.
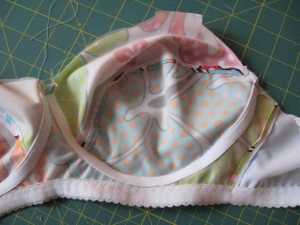
The close-up shot of the inside of the right cup shows some of the other materials and techniques, including the underwire casing and the back band fabric. The underwire casing is pretty neat – it’s actually a tube so you sew it down and then pop it open and slide the underwire inside the casing itself, rather than putting the underwire between the bra fabric and the casing. All of the exposed seam get ‘butterflied’ or opened flat and edgestitched 1/8″ away from the seam on each side. Sure enough, if you look at RTW… you’ll find the same thing.
I don’t have any photographs of the finished bra, because, well… there don’t need to be any picture of me wearing it on the web! However, here’s the last photo I took of the process which shows everything in place except for the neckline elastic and the little white bow I eventually added in front.

And I wonder why my dress form doesn't help with fitting. There are no hollows when this is on the body!
Did I mention that I have a matching pair of boy shorts with hot pink beaded lace for the waistband? Yes, indeed….


Chante said,
November 16, 2010 at 2:19 am
I keep a stuffed-with-bits-of-tissue bra on mine when I’m fitting tops.
Michele said,
March 2, 2011 at 7:42 pm
I was wondering if you could share your bra pattern. I am a similar size, and have recently decided that i need to make my own bras, since finding ones that fit (let alone look nice) is a near impossibility.
Thank you !
jennifer said,
July 28, 2011 at 10:19 pm
Wow, this is so cool!! I love your fabric choice.